The Continuous Delivery Workshop: Improving Your Cycle Time
The Continuous Delivery Workshop: Improving Your Cycle Time

Why would we want to release faster?
In software development, releasing faster reduces the risk for your product. When we release small increments, it is easier to roll back or fix the problem altogether, helping your team move forward.
It also enables the team and stakeholders to learn faster from their efforts and pivot if needed.
Is our feature actually valuable?
Is this what our users need?
Does this feature create a competitive edge?
The Continuous Delivery Workshop
This workshop is focused on our cycle time. We visualize our development process and brainstorm where we can make improvements by finding ideas from others. Finally, making an experiment on how we can improve our cycle time and, thus, our release process.
Preparation for the workshop
Before we go into our workshop, it is best to be prepared. We'll need to gather the following:
- Cycle time
- Lead time
- Amount of incidents after a release
- The Definition of Done
Online
When running this workshop online, you'll need to prepare an online whiteboard.
Board preview
Offline
If you run this in your own meeting room, you'll need the following tools to run the workshop.
- Two different colored sticky notes
- Sharpies
- Laptops for each participant
- A beamer or screen to project on
- A whiteboard to draw the effort impact scale on (or an A3 paper with the scale on)
- A wall to put the development timeline on
Alright! Now that you've got everything you need, it's time to move to the workshop itself.
Development timeline
In the first exercise, we will map out our current development process. The starting point is when we start working on an item in the sprint backlog. The end is when the item is released in production.
Notice that the end is in production. Ask the participants to add as many steps that should be in the release process and not just one sticky note, "release the item". In this phase, we want as much detail as possible of what our current software release process looks like.
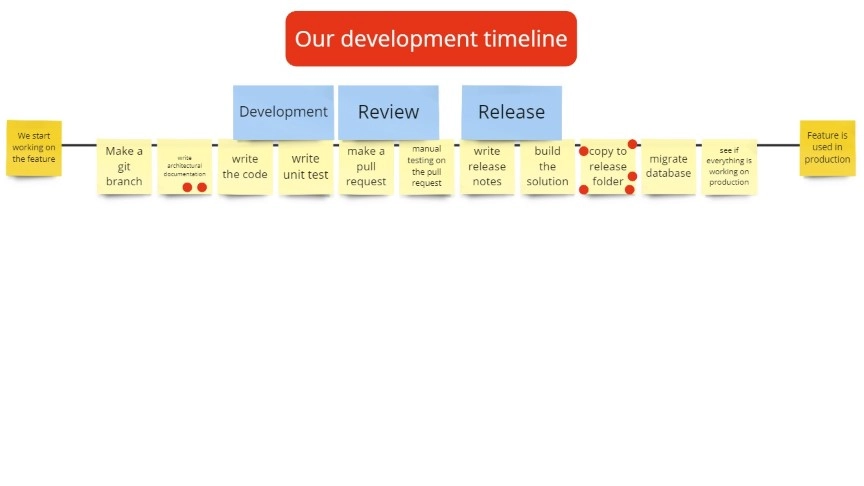
Every team member gets 5 minutes to write the steps on sticky notes in silence. After the 5 minutes are passed, we start building our timeline chronologically together.
On a wall or whiteboard, we start with the first steps on the left and add the next steps to the right. Duplicates can be removed or put on top of each other. Do this in group for 5-10 minutes.
(optional) Add categories with different colored sticky notes on top of the timeline, like automated tests, database migration, ...
Give each participant 3 votes to vote on the biggest bottleneck when it comes to the speed of delivery. Give them 3 minutes to vote.
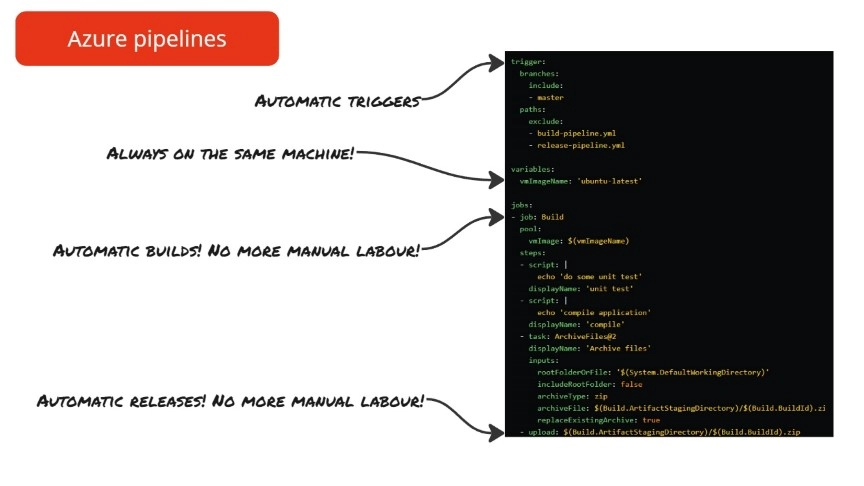
Lightning demos
Take the top-voted item and rephrase the problem into an opportunity question.
Now give each participant 15 minutes to search with their laptop to see what others are doing in this step. They should try to build one slide to present their ideas to the rest of the group.
As a facilitator, write the name of the idea on a blue sticky note. Add more yellow stickies for keywords of the idea if needed.
Give each participant 5 votes and 3 minutes to vote on what they think is the best idea to improve the cycle time.
Now give each participant a vote with their initials written on it and let them choose what would have the most impact on the team in a positive way. After they chose their item, let them explain to the group why they chose this item.
Now take the top 5 ideas to the effort impact scale.
Effort Impact scale
After presenting our ideas with the lightning demos, we have a list of ideas the group thinks will help improve our cycle time.
But you probably should not act on all these solutions the team created. When creating actionable tasks for your retrospective, it is good to know which action to take first.
Here comes the effort impact scale!
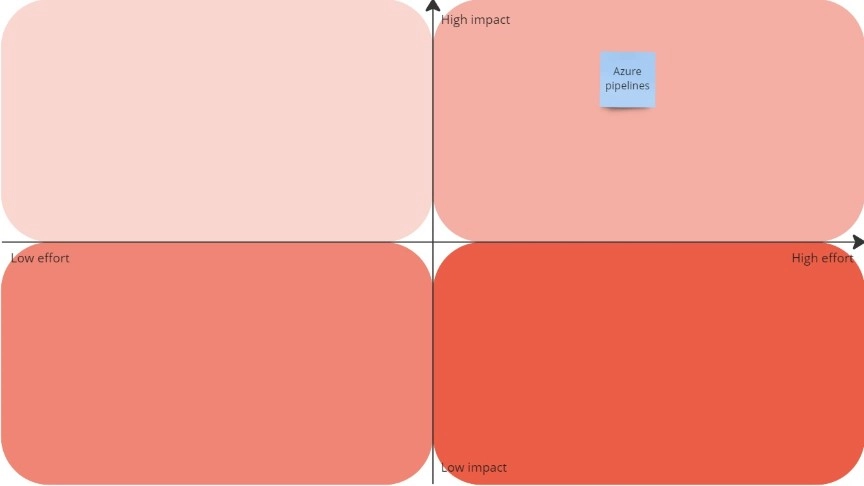
The effort impact scale is a matrix that visualizes how much effort is against the impact of an idea.
The effort impact scale is a great way to test the ideas created in the lightning demos. The Y-axis represents the impact of the idea. The X-axis represents the effort to be put into the idea.
Impact
You'll start with Impact first.
You take the ordered ideas from the lightning demos and take the sticky note with the most votes. You start in the middle of the board and ask the group: "What impact will this idea have on us as a team? Will this be higher or lower on the impact scale?"
Leave the ideas on the Y axis.
Effort
Now you'll go through each idea that sits on the Y axis and ask the team: "How much effort will it take for us as a team to realize this idea? Will it be more effort or less effort on the scale?"
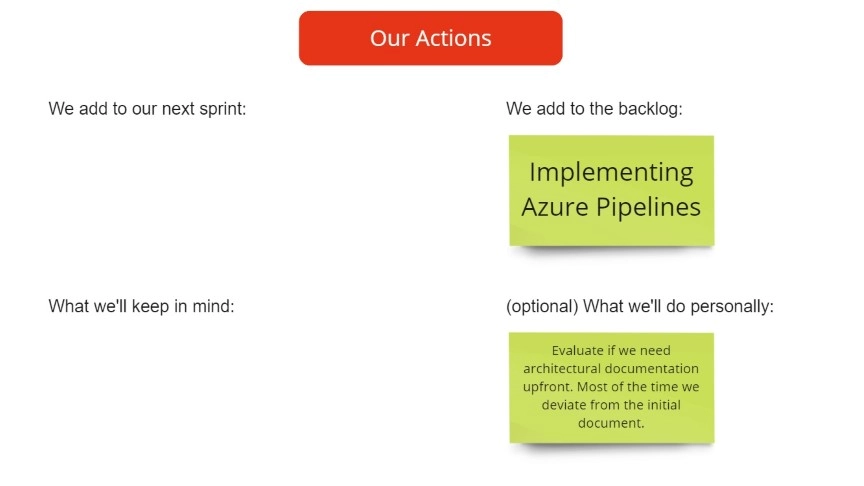
Create actionable items
After this exercise, you'll have the ideas visualized on the effort impact scale.
Now it is time to tell the group what actions to take!
⬆️⬅️ Top left
The top left are ideas or experiments you can do now! Add them to the sprint backlog for the next sprint.
⬆️➡️ Top right
These are projects you can do in the future. You'll probably do these if none of the top-left ideas didn't work. These ideas are our higher-effort solutions.
Add these to the product backlog so that your product owner can prioritize this item.
⬇️⬅️ Bottom left
You can put these ideas on a backlog, so you'll find them back. You don't need to act on these just yet.
Keep them in mind but focus first on the items on the top.
⬇️➡️ Bottom right
Ignore these ideas. Throw them in the 🗑️. These are higher-effort solutions with a low impact.
(optional) Use 15% solutions for personal actions
Invite the group to think about the following questions:
- "What can you do without more resources or authority?"
- "Where do you have the freedom to act?"
FAQ
What is lead time?
Lead time is the number of days when a product backlog item is added to the product backlog until it is released in production.
What is cycle time?
Cycle time is the number of days when a product backlog item is started to be worked on until it is released in production.
When should we run a cycle time improvement workshop?
Well, you can look for the following signs:
- Everyone is on edge when a release is planned.
- Teams batch everything into a quarterly or yearly release.
- A release is a large operation and has many changes. Your release notes are almost as big as a book.
- It takes a long time for bugs to be resolved.
- When you don't create Product Increments every sprint. This means a potential releasable product.
What can we do to release software faster?
Visualize your current release process with the workshop above. Try to build a release strategy with your team to see how you can release your features faster.
Some tactics you can use are:
- Feature toggles to hide features that are not ready to launch.
- Giving users the ability to use the old feature.
- Giving users the ability to opt-in to use beta features.
- Measure lead and cycle times.
- Automating your release process
- Test automation
Who decides to release a product increment?
In the end, the Product Owner decides to release a product increment. He does this by being informed by the development team and stakeholders.
The Product Owner can decide not to release a done Increment when:
- It would bring the product into a state where it is more likely that the users will run into issues. This can happen when the feedback during the Sprint Review isn't positive.
- It brings the product into a state where it does not comply with legal or fiscal requirements.
- It would bring an avoidable risk to the brand. For example, releasing a new cash register software during the Christmas period.